Book Printing · Formats & construction
Lift-the-Flap Book Printing
Turn a question, scene or illustration into a reveal. Build a custom lift-the-flap book around printed panels that readers open by hand, with the page structure and artwork planned together.
- Hand-opened reveals with planned hinge and glue zones
- Board-book or layered-page construction
- Structural dummy and assembled-sample checks
Start with the intended use, finished size and quantity. The material and construction can follow.
The product in use
A second picture behind every opening
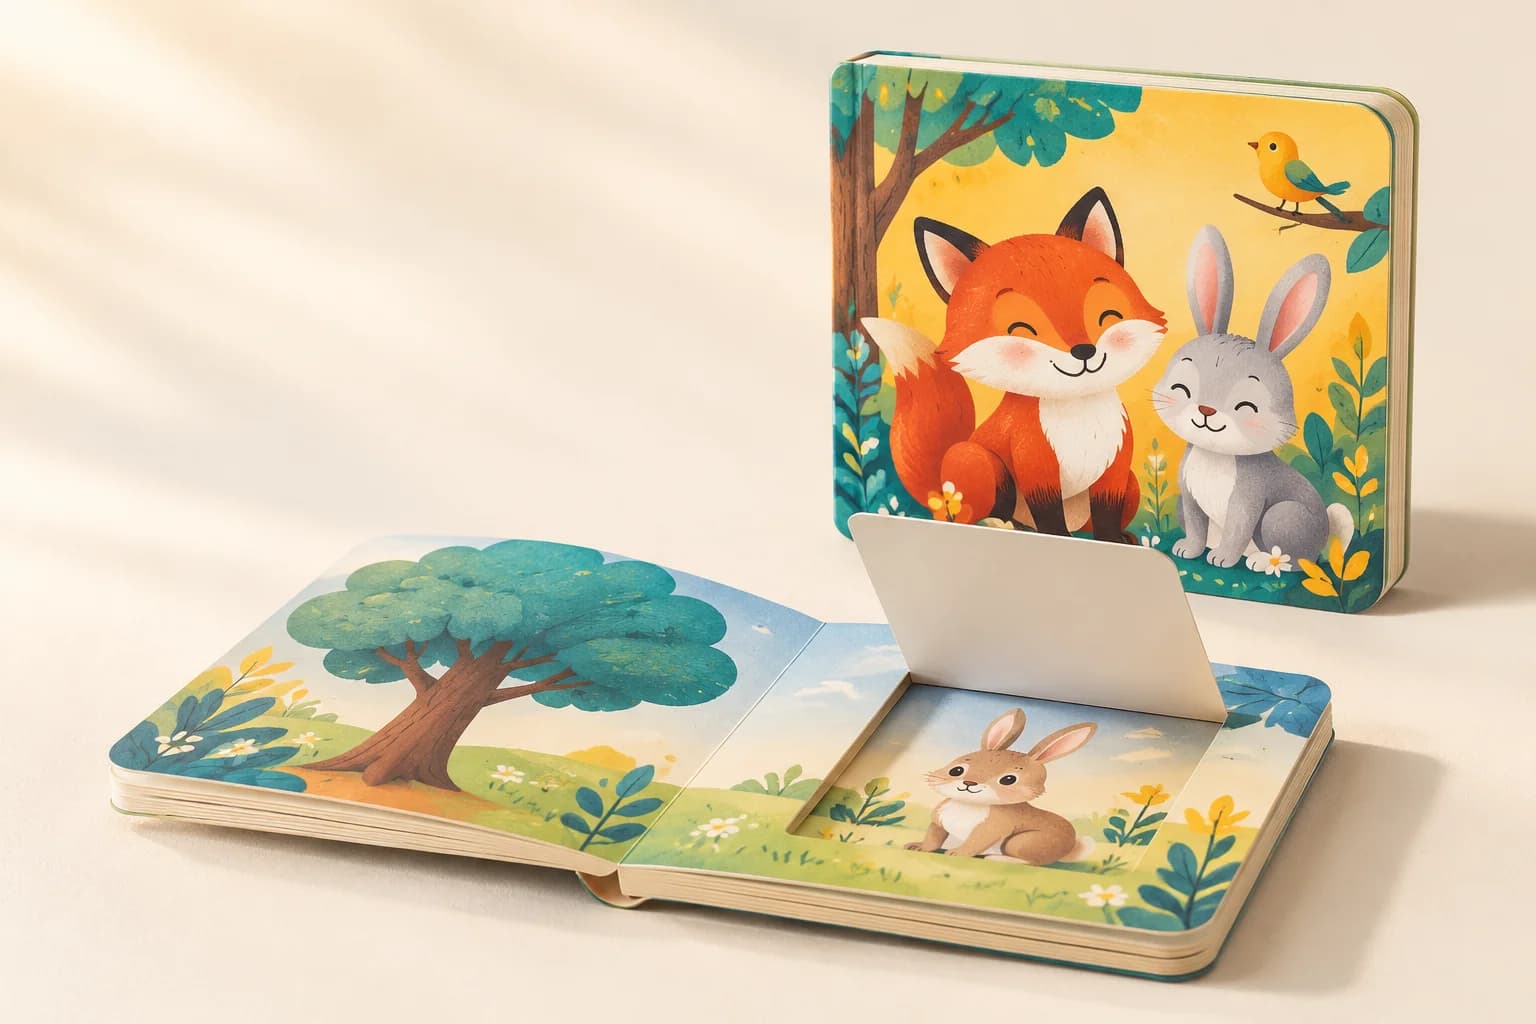
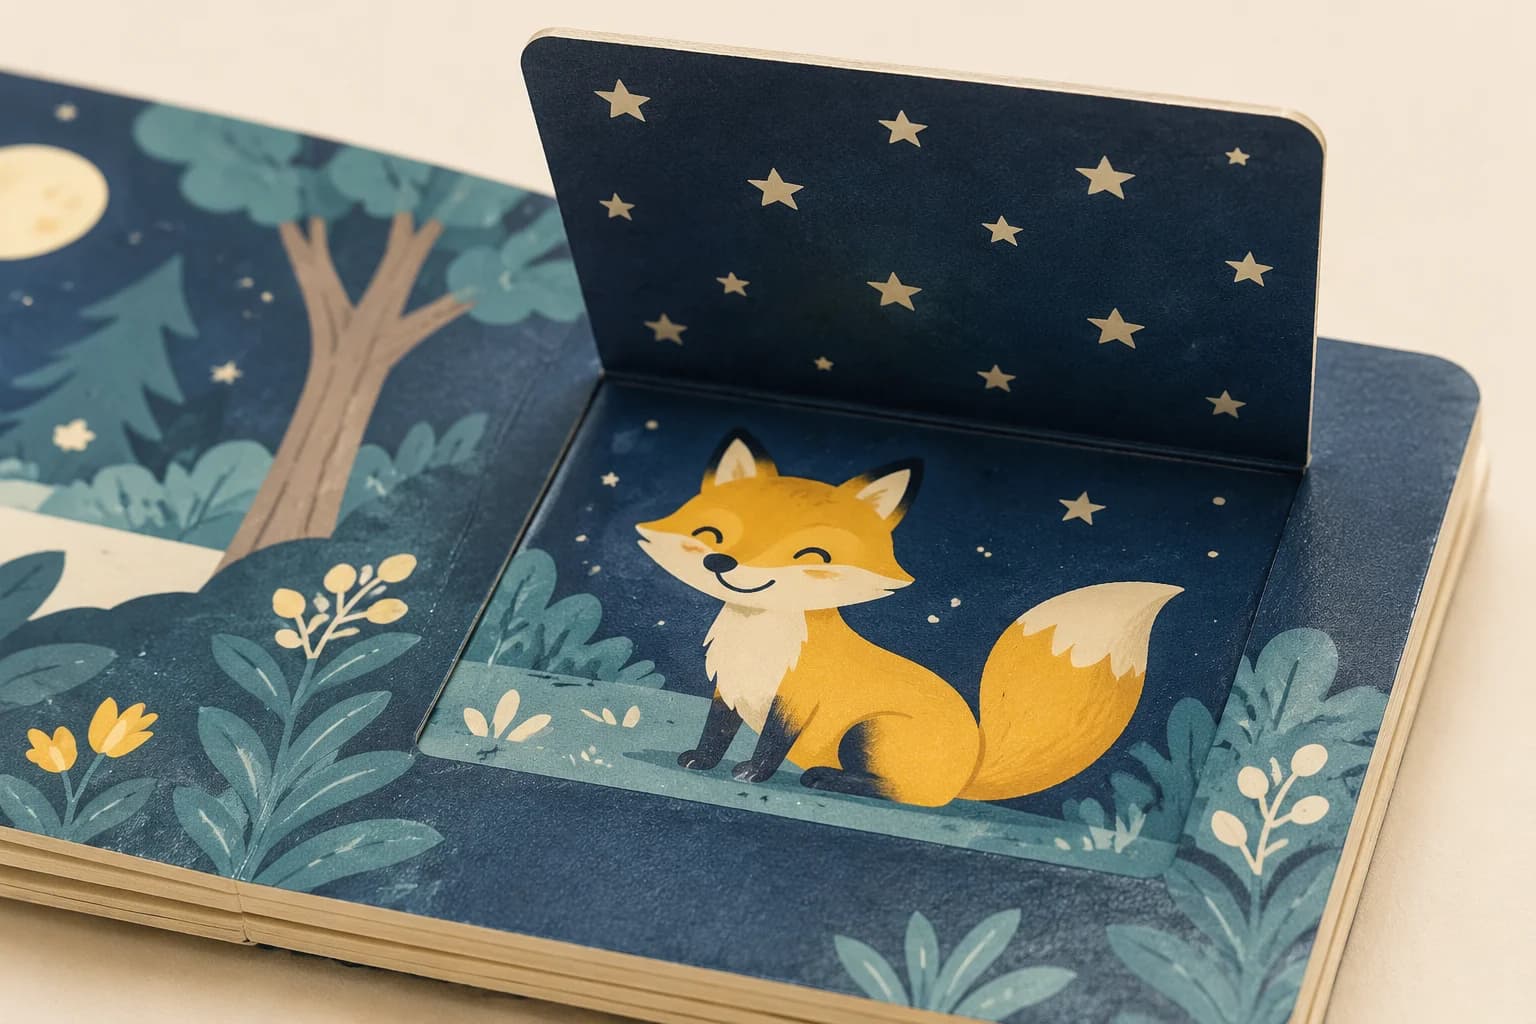
A lift-the-flap book places a movable panel over part of a printed page. The reader lifts one free edge while the opposite edge stays attached, exposing an answer, character or hidden scene. Unlike a pop-up, the reveal does not rise automatically when the spread opens. This makes the format useful for question-and-answer learning, naming games and layered explanations. The experience depends on more than the visible artwork: the grip, hinge position and picture underneath must work together without obstructing the neighboring flap or the page turn.
What makes up the finished product?
- The moving flap
- A printed panel with an accessible free edge and a defined hinge. Its reverse can carry a second image or a continuation of the explanation.
- The fixed reveal
- Artwork on the layer below. Position it against the actual cut opening, leaving working space so a small shift does not crop a face or answer.
- The supporting leaf
- The assembled page holds the hinge and hidden artwork in position. Its layers, glue pattern and clearance determine how the mechanism behaves.
Specifications and materials
Lift-the-Flap Book Printing specifications
Use these reference options to build the project brief. Dimensions are design examples; material availability, tooling and production timing depend on the confirmed specification.
| Parameter | Reference or option | Why it matters |
|---|---|---|
| Finished size | Closed width × height in mm; example: 210 × 210 mm | Also supply the open spread. Place the actual-size dummy in the intended reader’s hands to assess reach and access. |
| Extent and flap count | State spreads, printed sides and flaps separately | For example, 5 spreads with 2 flaps each means 10 flaps; it does not define the book’s complete pagination or cover. |
| Page-board reference | 350–400 gsm board is a published industry reference for layered board-book leaves | Reference only, not a Lemon stock range. Specify individual layers and finished caliper separately; GSM is mass per area, not thickness. |
| Flap and reveal surfaces | Printable folding card; white-faced board; coated printed facing over a board core | Use a printable underside where the flap reverse carries artwork. Compare fold behavior, edge appearance and opacity on the selected construction. |
| Flap construction | Integrated die-cut face layer or separately attached flap | The drawing must identify the fixed hinge, free edges and glue zones. Different constructions need different artwork and assembly plans. |
| Printing and finish | Full-color artwork; varnish or film finish suited to the chosen stock | Assess color across the flap and surrounding page, then check cracking, edge lift and rubbing after repeated opening. |
| Production files | Print-ready PDF plus vector cut, crease and glue layers; 300 ppi images at final size | Use the agreed structural template for bleed and safety zones. Include flap fronts, reverses and reveal art, with an assembly map. |
| Quantity and schedule | Quote by finished books per title, language and configuration | Flap count and assembly complexity affect pricing and scheduling. Separate structural development, printed sampling, production and transport in the quote. |
Compare the material and its effect.
Choose the surface and construction for the way the finished product will be used. The options below are selection references, not a guaranteed inventory list.
White printable card
White-faced folding card, with a printable reverse where needed
Supports artwork on both faces where both surfaces are suitable for printing. The core color remains a separate material choice.
Sample check: Check opacity, crease behavior and the cut edge on the finished sample; whiteness alone says nothing about hinge life.
Printed facing over board
Coated printed facing bonded to a supporting board layer
Separates the visible print surface from the page’s structural thickness.
Sample check: Plan the adhesive mask and opening before bonding. A thick support leaf does not require an equally thick moving flap.
Selected sample focus — White printable card: Check opacity, crease behavior and the cut edge on the finished sample; whiteness alone says nothing about hinge life.
Format & usable space
Plan the size, opening and reveal sequence
210 × 210 mm closed trim — illustrative square format
This planning example provides a broad spread for a scene and several separated reveals. It is not a universal book size or a manufacturing limit. Flap positions need to be checked on the actual spread at final scale.
This is a design reference, not a required size or a manufacturing limit.
Large reveal or several small discoveries?
One prominent flap gives a clear focal point; several smaller flaps create a search sequence.
More flaps mean more cut edges, registration points and opening checks. Keep moving parts clear of the gutter and of neighboring panels, and evaluate the closed stack as well as the open spread.
Single large flap
A clear prompt and one concealed answer
Useful when the reveal needs a large image; check the grip and the reach to the free edge.
Several independent flaps
Multiple discoveries in one spread
Useful for search activities; keep cuts separated and account for the extra assembly and checking.
Nested reveals
A planned sequence of openings
Useful for layered explanations; verify collision, opening order and closed thickness in a dummy.
View the original format reference
Details that change the finished product
Cut lines, hinge behavior and glue control
Keep one edge fixed and three edges free
An integrated flap is cut through its moving face layer while its hinge remains attached. A separate flap uses an attachment tab bonded to the page. These are alternative constructions, not interchangeable file layouts. A finger notch or accessible free edge helps the reader start the movement without pulling at the hinge.
Match the crease to the actual card
A thicker flap can feel substantial yet resist opening or split at the fold. Board grade, thickness, grain direction, crease geometry and surface finish interact. Test the complete printed and finished flap in its intended direction; inspect the fold for whitening, cracking and film separation.
Bond the page without bonding the reveal shut
The glue pattern must leave the moving panel and its operating space free. Align the cut face layer with the hidden picture before bonding, and check for squeeze-out after pressing. The assembled sample should expose the intended artwork cleanly and close without a raised or sticky edge.
Choose a reveal that serves the story
Question-and-answer learning
Pair a visible prompt with an answer beneath one flap. Leave enough space for the reader to grip the edge without covering the question. Check that the reverse does not accidentally disclose the next answer.
Find-and-reveal picture books
Use a few clearly separated openings within a larger scene. Give each flap a purposeful reveal and a reachable edge; crowded cuts and overlapping hinges can make the activity awkward.
Layered reference and explanation
Reveal what is inside a vehicle, building or natural system. Establish the order of opening in a paper dummy. Nested panels need their own clearance and closing sequence rather than simply more layers of artwork.
Solve the risk before production
Prevent sticking, misaligned reveals and uneven closure
The critical finished-product check
Check the whole opening sequence, not one attractive flap. On an assembled sample, lift every panel, turn the page and close the book. Look for rubbing at adjacent cuts, a hinge pulled by the gutter, hidden artwork covered by glue, or stacked flaps that stop the book closing evenly.
A flap sticks or will not open
Why it happens: Glue reaches a moving area, adhesive squeezes out, or a cut edge rubs against the surrounding panel.
Fix and check: Review the glue mask and cut clearance, then open every flap on the pressed and dried sample. Inspect the reveal for adhesive marks.
The hidden image is cropped
Why it happens: The reveal artwork has been placed against the nominal cut with no allowance for assembly movement.
Fix and check: Keep essential detail inside a working margin, extend the background and compare cut-to-image alignment on the assembled sample.
The book will not close evenly
Why it happens: Several thick flaps or attachment tabs accumulate in the same area, or a panel is left caught across a fold.
Fix and check: Redistribute moving parts, reconsider layer thickness and check the complete closed book. Do not approve only an isolated spread.
When to choose another format
Lift flaps, plain board pages or pop-ups?
| Alternative | Use and trade-off |
|---|---|
| Board Book Printing | Choose a plain board book when the story works through page turns alone. It removes moving-flap assembly and hinge checks, but does not offer a concealed reveal. |
| Pop-Up Book Printing | Choose a pop-up when a raised scene or automatic movement is the point of the spread. It introduces different folds, attachment points and closing constraints; a lift flap keeps the reveal reader-controlled and mostly flat. |
Sample and approval
Test the mechanism before approving the print
Free samples are available, with preparation completed within 15 days. Confirm the sample scope; courier arrangements and transit time are separate.
Structural sample
Checks dimensions, fit and assembly using unprinted or representative materials. It does not establish final color.
Printed proof
Checks text, image reproduction and artwork on the agreed proof medium. It may not reproduce final assembly or every finish.
Complete finished sample
Use the actual-size structural dummy first. On the printed assembled sample, open every flap in sequence, inspect hidden and reverse artwork, look for glue transfer, and close and reopen the complete book. Record the agreed operating test and any damage rather than assigning an unsupported durability rating.
From brief to delivery
Specify the complete moving-page project
From reveal sketch to approved assembled book
Map the reading sequence
Supply the title brief, intended age and market, spread plan, flap IDs and quantities. A hand-cut dummy is useful even before final illustrations exist.
Resolve the mechanism
Select the layer construction, hinge positions and working clearances. Review an actual-size structural sample before locking the artwork and cutting layout.
Approve the assembled reference
Check the printed finishes, reveal alignment, glue control and opening behavior together. Record the approved artwork revision, materials and sample differences.
Release a defined order
Agree quantities per title and language, production checks, packing, destination and schedule. Keep sample approval, manufacturing and freight as separate milestones.
Ship with the flaps closed and protected
Pack books with all flaps fully closed so exposed edges cannot catch adjacent copies. Use a divider or individual protection where the approved construction requires it. Agree carton counts and weight, label title and language versions clearly, and protect the paperboard against moisture and crushing in transit.
- Create a spread-by-spread mechanism map. Give every flap an ID and mark its hinge direction, closed position, reverse image, underlying reveal and assembly order. Show nested panels as separate stages.
- Supply vector cut and crease lines on named non-printing layers, with glue areas clearly separated. Keep essential type clear of cuts, the hinge and the gutter; extend backgrounds to the bleed boundary on the approved template.
- Check all three artwork states: flap closed, flap open and flap reverse visible. A flat PDF proof verifies artwork placement but cannot demonstrate hinge strength, glue control or the way the book closes.
Project questions
Planning Lift-the-Flap Book Printing
How is a lift-the-flap book different from a pop-up book?
A flap is opened directly by the reader and reveals a flat picture or text underneath. A pop-up uses folded structures that rise or move as the spread opens. Choose flaps for a controlled question-and-answer reveal; choose pop-ups when the raised three-dimensional scene is central to the experience.
How should I count pages and flaps for a quotation?
Provide the spread count and identify the cover separately, then list the flap count on each spread. A flap is a moving part, not automatically an extra page. Include a diagram of nested flaps, attachment tabs and any other mechanisms so the assembly work is clear.
Will a heavier flap stop the hinge tearing?
Not by itself. Stiff card can concentrate bending at a short hinge, and the finish can crack even when the card remains intact. Compare the selected stock, crease and hinge geometry on a finished sample. Agree an opening test method and acceptance criteria before production rather than assuming a universal cycle rating.
Which sample should be approved before production?
Start with a structural dummy to verify flap size, reach and closing behavior. Then review a printed, finished and assembled sample for color, reverse artwork, cut registration and glue clearance. Keep the approved revision and record any sample features that differ from the intended production construction.
Can rounded corners establish that the book is suitable for young children?
No. Corners are only one design feature. The intended age, sales market, materials, finishes and security of moving parts all affect the required assessment. Identify those conditions during development and arrange the applicable review or testing for the actual construction; a sample image is not safety documentation.
Specify the finished product.
Send finished book quantity per title and language, closed width × height, spread count, flap count on each spread, hinge directions and intended reader age. Include a sketch or paper dummy, cover style, destination and required arrival date. Mark any nested flaps or other mechanisms separately.